In this article we will follow along complete dbt(Data Build Tool) bootcamp to create an end-to-end project pipeline using DBT and Snowflake. We begin by outlining the steps we will be performing in this hands-on project.
1.Loading Data from AWS to Snowflake:
- Data from S3 is loaded into Snowflake using the
COPY INTOcommand. - The raw data is stored in a dedicated schema (
Airbnb.RAW).
2. Configuring Python & DBT:
- Set up a virtual environment and install
dbt-snowflake. - Create a user in Snowflake with appropriate permissions.
- Initialize a dbt project and connect it to Snowflake.
3. Creating Staging Layer Models:
- Models in dbt are SQL files representing transformations.
- Staging models transform raw data into a cleaner, more structured format.
- Use dbt commands to build and verify models.
4. Creating Core Layer Models & Materializations:
- Core models apply further transformations and materializations.
- Understand different materializations like views, tables, incremental, and ephemeral.
- Create core models with appropriate materializations and verify them in Snowflake.
5. Creating DBT Tests:
- Implement generic and custom tests to ensure data quality.
- Use source freshness tests to monitor data timeliness.
6. Creating DBT Documentation:
- Document models using schema.yml files and markdown files.
- Generate and serve documentation to provide a clear understanding of data models and transformations.
The complete sources and code for this article can be found from the original course here.
Lets begin the hands-on implementation step by step.
1.Loading data from AWS cloud to Snowflake
S3 bucket –> Snowflake Platform –> Db.Schema (Airbnb.Raw)
Create Raw Schema in snowflake
In order to get data ready and loaded into Snowflake, we will do a few steps .
- Create a database named Airbnb in our Snowflake instance.
- Create a schema , we name this schema as “RAW”. Fully qualified name will then be Airbnb.Raw
- Create tables within the Schema Airbnb.RAW to load the data into.
We will create the following three tables and then populate the data from S3 using Snowflake’s Copy Into command.
| Table | Data Source | How is data loaded ? |
| Airbnb.RAW.raw_listings | s3://dbtlearn/listings.csv | COPY INTO raw_listings (id, listing_url, name, room_type, minimum_nights, host_id, price, created_at, updated_at) from ‘s3://dbtlearn/listings.csv’ FILE_FORMAT = (type = ‘CSV’ skip_header = 1 FIELD_OPTIONALLY_ENCLOSED_BY = ‘”‘); |
| Airbnb.RAW.raw_reviews | s3://dbtlearn/reviews.csv | COPY INTO raw_reviews (listing_id, date, reviewer_name, comments, sentiment) from ‘s3://dbtlearn/reviews.csv’ FILE_FORMAT = (type = ‘CSV’ skip_header = 1 FIELD_OPTIONALLY_ENCLOSED_BY = ‘”‘); |
| Airbnb.RAW.raw_hosts | s3://dbtlearn/hosts.csv | COPY INTO raw_hosts (id, name, is_superhost, created_at, updated_at) from ‘s3://dbtlearn/hosts.csv’ FILE_FORMAT = (type = ‘CSV’ skip_header = 1 FIELD_OPTIONALLY_ENCLOSED_BY = ‘”‘); |
We have now sourced the raw data that we want to build our data pipeline on.
2.Configuring Python & DBT
Next step is to create a temporary staging area to store the data without transformations . Since downstream processing of data can put considerable load on the systems, this staging area helps in decoupling the load. It also helps in auditing purposes.
The flow for this step will be :
Flow
S3 bucket –> Snowflake Platform –> Db.Schema (Airbnb.RAW) –> [dbt] –>Db.Schema(Airbnb.DEV)
In first step, we created 3 tables in RAW schema manually and copied data into them. In this step, we will use DBT to create staging area .
Setting up Python and Virtual Enviornment
The first step we need to do is to setup python and a virtual enviornment. You can use global enviornment as well. However, it is preferred to go with virtual enviornment. I am using Visual studio code for this tutorial and assuming that you can configure VS code with a Virtual enviornment, therefore, not going into its detail. If you need help setting it up, please follow this guide for setup.
After setting up virtual enviornment, please intall dbt-snowflake. DBT has adapters ( packages) for several data warehouses. Since we are using Snowflake in this example, we will use the following package :
pip install dbt-snowflakeCreating user in Snowflake
To connect to Snowflake, we created a user dbt in snowflake, granted it role called transform and granted “ALL” priveleges on database Airbnb. ( This is by no means a standard or recommended practice, we will do all blanket priveleges only for the purpose of this project). We use the following SQL in Snowflake to create a user and grant privileges.
-- Create the `dbt` user and assign to role
CREATE USER IF NOT EXISTS dbt
  PASSWORD='dbtPassword123'
  LOGIN_NAME='dbt'
  MUST_CHANGE_PASSWORD=FALSE
  DEFAULT_WAREHOUSE='COMPUTE_WH'
  DEFAULT_ROLE='transform'
  DEFAULT_NAMESPACE='AIRBNB.RAW'
  COMMENT='DBT user used for data transformation';
GRANT ROLE transform to USER dbt;


-- Set up permissions to role `transform`
GRANT ALL ON WAREHOUSE COMPUTE_WH TO ROLE transform;
GRANT ALL ON DATABASE AIRBNB to ROLE transform;
GRANT ALL ON ALL SCHEMAS IN DATABASE AIRBNB to ROLE transform;
GRANT ALL ON FUTURE SCHEMAS IN DATABASE AIRBNB to ROLE transform;
GRANT ALL ON ALL TABLES IN SCHEMA AIRBNB.RAW to ROLE transform;
GRANT ALL ON FUTURE TABLES IN SCHEMA AIRBNB.RAW to ROLE transform;
Now that we have the credentials for Snowflake, we can provide this information to dbt for connection.
Creating DBT Project
Once dbt-snowflake and its required dependencies are installed, you can now proceed with setting up dbt project. Inside the virtual enviornment , initiate the dbt core project with dbt init [project name]
dbt init mydbt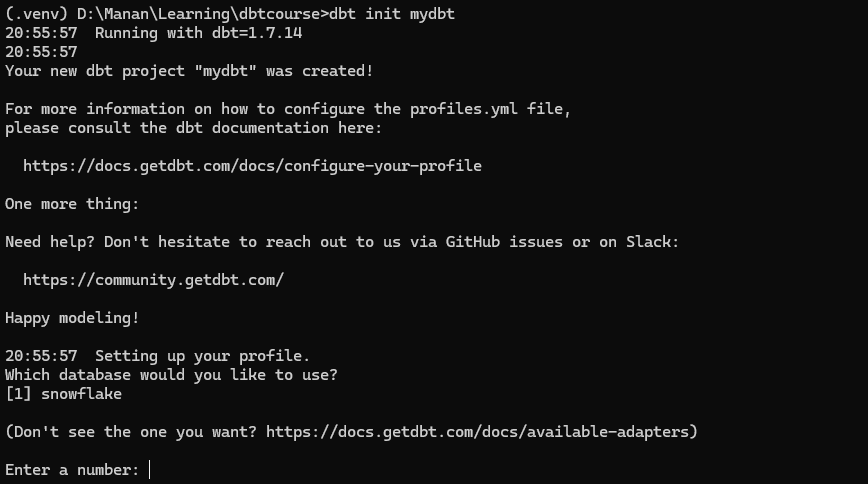
In my case , I am building this dbt project within DBTCOURSE folder, I will name my dbt core project as mydbt, therefore, my folder structure would be :
DBTCOURSE -> mydbt > ALL DBT FOLDERS AND FILES
Since its the first time we are running dbt init, it will ask the name of the project, the database we are connecting to and the authentication credentials for the platform ( snowflake) .
Connecting DBT to Snowflake
After project is initiated, DBT will ask for user access credentials to connect to Snowflake with appropriate permissions on the database and schema’s we want to work on. Given below is summary of information command prompt will ask to connect.
| Prompt | Value |
| platform ( number) | [1] Snowflake |
| account | This is your Snowflake account identifier. |
| user | User we created to connect to snowflake ( dbt in this case) |
| password | user’s password |
| role | Role we assigned to the above user, that we want dbt to open the connection with |
| database | Database we want our connection established with (AIRBNB in this case ) |
| schema | This is the default schema where dbt will build all models ( DEV in this case ) |
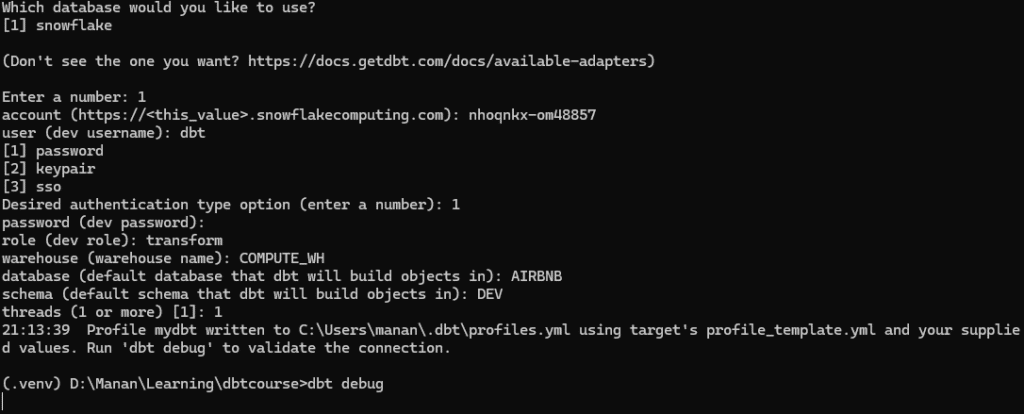
At times, finding Snowflake’s account identifier can be tricky. you can find it from Snowflake > Admin > Account > Hover over the account row.

Verifying DBT connection
We can verify whether our dbt project has been configured properly and that it is able to connect to Snowflake using the dbt debug
dbt debug

The verbose output is quite long, however, I have provided screenshots only of key checks which enable us to start working with our project.
3.Creating data models in Staging Layer with DBT
Concept : Models in DBT
In dbt (Data Build Tool), models are SQL files that contain SELECT statements. These models define transformations on your raw data and are the core building blocks of dbt projects. Each model represents a transformation step that takes raw or intermediate data, applies some logic, and outputs the transformed data as a table or view in your data warehouse.Models promote modularity by breaking down complex transformations into simpler, reusable parts. This makes the transformation logic easier to manage and understand.
We will explore how models in dbt function within a dbt project to build and manage a data warehouse pipeline. An overview of key model characteristics and functions we will look at are :
- Data Transformation: Models allow you to transform raw data into meaningful, structured formats. This includes cleaning, filtering, aggregating, and joining data from various sources.
- Incremental Processing: Models can be configured to run incrementally, which means they only process new or updated data since the last run. This improves efficiency and performance.
- Materializations:
- Models in dbt can be materialized in different ways:
- Views: Create virtual tables that are computed on the fly when queried.
- Tables: Persist the transformed data as physical tables in the data warehouse.
- Incremental Tables: Only update rows that have changed or been added since the last run.
- Ephemeral: Used for subqueries that should not be materialized but instead embedded directly into downstream models.
- Models in dbt can be materialized in different ways:
- Testing: dbt allows usto write tests for your models to ensure data quality and integrity. These can include uniqueness, non-null, and custom tests that check for specific conditions.
- Documentation: Models can be documented within dbt, providing descriptions and context for each transformation. This helps in understanding the data lineage and makes the project more maintainable.
- Dependencies and DAGs: Models can reference other models using the
reffunction, creating dependencies between them. dbt automatically builds a Directed Acyclic Graph (DAG) to manage these dependencies and determine the order of execution. - Version Control: Because dbt models are just SQL files, they can be version controlled using Git or any other version control system, enabling collaboration and change tracking.
Concept: Staging Layer
Staging layer is an abstraction used to denote purpose of data models in enterprise data warehouses. The concept of staging layer is prevalent in both Kimball and Inmon methodologies for data modeling . For dbt purposes, we will use a folder src under models to create the staging layer. Using staging layer we decouple the source data for further processing. In staging layer we create 3 simple models under models/src/
| # | Model | Transformation | Materialization |
| 1 | Airbnb.DEV.src_listing | Column name changes | View |
| 2 | Airbnb.DEV.src_reviews | Column name changes | View |
| 3 | Airbnb.DEV.src_hosts | Column name changes | View |
Creating staging layer models
We create a new file src_listing.sql and use the following SQL to create our first model
WITH raw_listings AS (
SELECT
*
FROM
AIRBNB.RAW.RAW_LISTINGS
)
SELECT
id AS listing_id,
name AS listing_name,
listing_url,
room_type,
minimum_nights,
host_id,
price AS price_str,
created_at,
updated_at
FROM
raw_listings
We repeat the same for src_reviews and src_hosts
WITH raw_reviews AS (
SELECT
*
FROM
AIRBNB.RAW.RAW_REVIEWS
)
SELECT
listing_id,
date AS review_date,
reviewer_name,
comments AS review_text,
sentiment AS review_sentiment
FROM
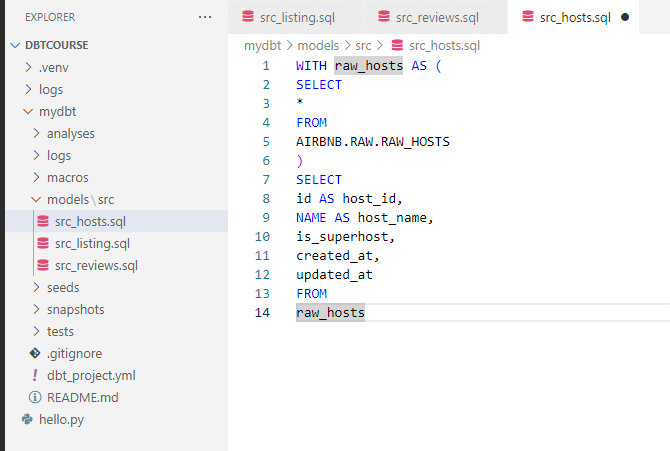
raw_reviewsWITH raw_hosts AS (
SELECT
*
FROM
AIRBNB.RAW.RAW_HOSTS
)
SELECT
id AS host_id,
NAME AS host_name,
is_superhost,
created_at,
updated_at
FROM
raw_hostsOur file structure after creating 3 models will be :
Finally, we can now run the dbt run command to build our first 3 models.
dbt runIt will start building models and in case there’s any error, it will show it. In case of succesful run, it will confirm on the prompt.
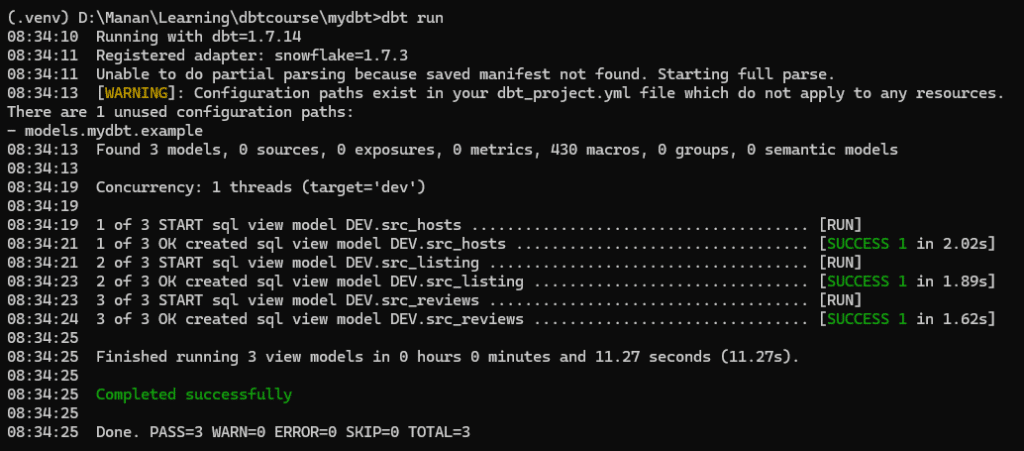
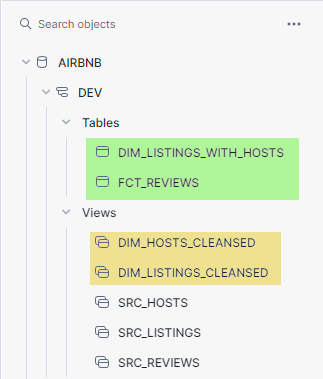
To confirm the models in our Snowflake database, we can now navigate to Snowflake and see whether our new models appear there .
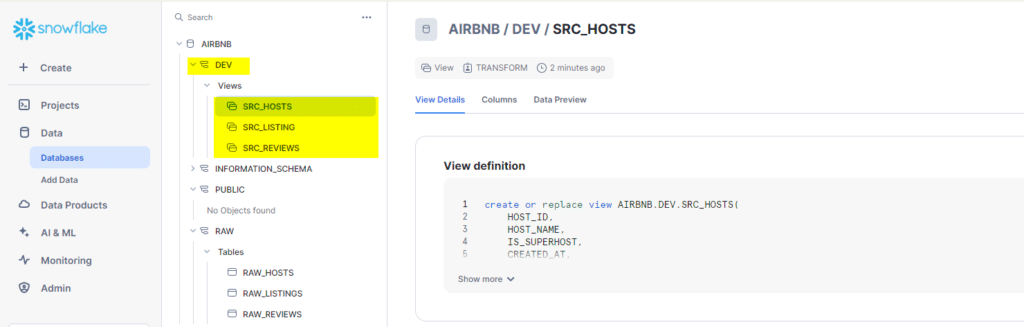
As you can see , dbt has succesfully created 3 new models under AIRBNR.DEV schema, thus completing our staging layer.
4.Creating core layer models & materializations
In this step , we will create the “Core” layer with three models. We will also explore materializations in dbt and make a choice of which materializations we want our models to have. A summary of models we will create in this step alongside their materialization choice is :
| # | Model in Core Layers | Transformations | Materialization |
| 1 | Airbnb.DEV.dim_listing_cleansed | Cleaning | View |
| 2 | Airbnb.DEV.dim_host_cleansed | Cleaning | View |
| 3 | Airbnb.DEV.dim_listings_with_hosts | Join & Clean | Table |
| 4 | Airbnb.DEV.fct_reviews | Incremental |
Flow Update
S3 bucket –> Snowflake Platform –> Db.Schema (Airbnb.RAW) –> [dbt] –>Db.Schema(Airbnb.DEV)–>[dbt]–>Db.Schema.Tables(Airbnb.DEV.DIM_*)
Concept: Materializations in DBT
Dbt supports four types of materialization. We can specify the materialization of a model either in the model file ( .sql) or within the dbt-project.yaml file. For our excercise, we will use both approaches to get familiar with both.
A comparative view of materializations supported by dbt and when to use them is as follows:
| Feature | View | Table | Incremental | Ephemeral |
|---|---|---|---|---|
| Description | Creates a virtual table that is computed on the fly when queried. | Creates a physical table that stores the results of the transformation. | Updates only the new or changed rows since the last run. | Creates temporary subqueries embedded directly into downstream models. |
| Use Case | Use when you need to frequently refresh data without the need for storage. | Use when you need fast query performance and can afford to periodically refresh the data. | Use when dealing with large datasets and only a subset of the data changes frequently. | Use for intermediate transformations that don’t need to be materialized. |
| Pros | – No storage costs.<br>- Always shows the latest data.<br>- Quick to set up. | – Fast query performance.<br>- Data is stored and doesn’t need to be recomputed each time. | – Efficient processing by updating only changed data.<br>- Reduces processing time and costs. | – No storage costs.<br>- Simplifies complex transformations by breaking them into manageable parts. |
| Cons | – Slower query performance for large datasets.<br>- Depends on the underlying data’s performance. | – Higher storage costs.<br>- Requires periodic refreshing to keep data up-to-date. | – More complex setup.<br>- Requires careful handling of change detection logic. | – Can lead to complex and slow queries if overused.<br>- Not materialized, so each downstream query must recompute the subquery. |
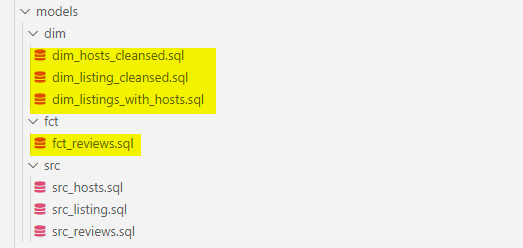
Creating Core Layer models
We will apply transformation to our staging layer models and create core layer models as discussed above. Our project structure after creating these models would change as shown below.
dim_hosts_cleansed
{{
config(
materialized = 'view'
)
}}
WITH src_hosts AS (
SELECT
*
FROM
{{ ref('src_hosts') }}
)
SELECT
host_id,
NVL(
host_name,
'Anonymous'
) AS host_name,
is_superhost,
created_at,
updated_at
FROM
src_hosts
dim_listing_cleansed
WITH src_listings AS (
SELECT
*
FROM
{{ ref('src_listings') }}
)
SELECT
listing_id,
listing_name,
room_type,
CASE
WHEN minimum_nights = 0 THEN 1
ELSE minimum_nights
END AS minimum_nights,
host_id,
REPLACE(
price_str,
'$'
) :: NUMBER(
10,
2
) AS price,
created_at,
updated_at
FROM
src_listings
dim_listings_with_hosts
WITH
l AS (
SELECT
*
FROM
{{ ref('dim_listings_cleansed') }}
),
h AS (
SELECT *
FROM {{ ref('dim_hosts_cleansed') }}
)
SELECT
l.listing_id,
l.listing_name,
l.room_type,
l.minimum_nights,
l.price,
l.host_id,
h.host_name,
h.is_superhost as host_is_superhost,
l.created_at,
GREATEST(l.updated_at, h.updated_at) as updated_at
FROM l
LEFT JOIN h ON (h.host_id = l.host_id)
fct_reviews
{{
config(
materialized = 'incremental',
on_schema_change='fail'
)
}}
WITH src_reviews AS (
SELECT * FROM {{ ref('src_reviews') }}
)
SELECT * FROM src_reviews
WHERE review_text is not null
{% if is_incremental() %}
AND review_date > (select max(review_date) from {{ this }})
{% endif %}
In our models above, we have explicitly created materialization configuration within the models for fct_reviews and dim_hosts_cleansed. For the others, we have used dbt-project.yaml file to specify the materialization.
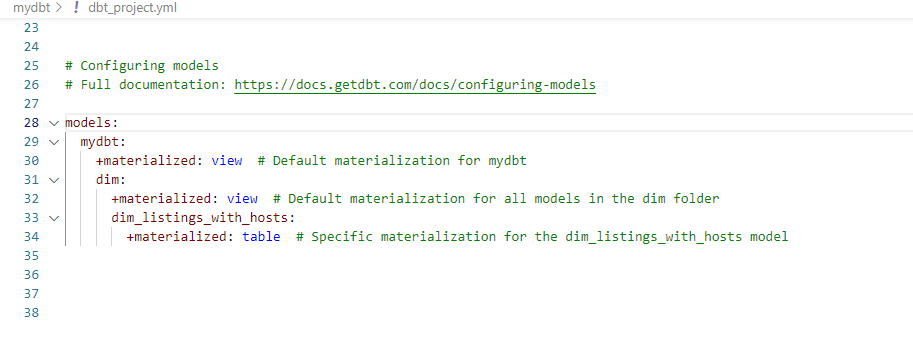
With the above materialization specifications within the Yaml file, we run the dbt and get the following output.
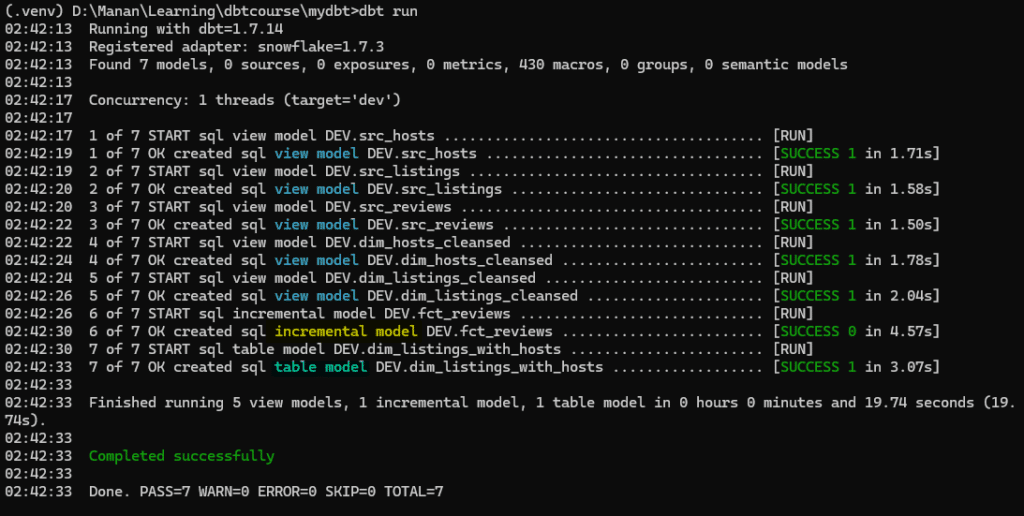
We can check the same in Snowflake interface , which will show us the new models created.
Adding sources to the models
Concept : Source in DBT
Sources in dbt are aliases given to the actual tables. Its an additional abstraction added over external tables which makes it possible to name and describe the data loaded into warehouse. Sources enable the following :
- We can calculate the freshness of source data.
- Test our assumptions about source data
- select from source tables in our models using {{source()}} function , this helps in defining lineage of data.
Adding Sources
To add sources to our model, we will create a file “sources.yml” ( Filename is arbitrary ) . Once we have created config file , we can now go in to src_* files and replace existing table names with our “sources”.
| Model | Table name without sources (Key: identifier) | Table name with sources(Key: name) |
| src_listings | select * FROM AIRBNB.RAW.RAW_LISTINGS | select * FROM {{source(‘airbnb’,’listings’)}} |
| src_hosts | select * FROM AIRBNB.RAW.RAW_HOSTS | select * FROM {{source(‘airbnb’,’hosts’}} |
| src_reviews | select * FROM AIRBNB.RAW.RAW_REVIEWS | select * FROM {{source(‘airbnb’,’reviews’}} |
Our sources.yml file now looks like this
version: 2

sources:
  - name: airbnb
    schema: raw
    tables:
      - name: listings
        identifier: raw_listings

      - name: hosts
        identifier: raw_hosts

      - name: reviews
        identifier: raw_reviews
Source Freshness
A benefit of using “sources” in DBT is to be able to maintain freshness of data. Source freshness is a mechanism in DBT which enables monitoring the timeliness and update frequency of data in our sources. Source freshness mechanism allows for “warning” or “error” as notification mechanism for data freshness.
Here are the steps to configure source freshness.
- In our sources.yml file, we decide a “date/time” field which acts as the cut-off point for source monitoring(loaded_at_field).
- We specify a maximum allowable data age ( in interval e.g. hours or days) before a warning or error is triggered.(warn_after or warn_before)
- We execute dbt source freshness command to check the freshness of sources.
- If the data exceeds the freshness thresholds, DBT raises warnings or errors.
Lets create a source freshness on reviews source.
- name: reviews
        identifier: raw_reviews
        loaded_at_field: date
        freshness:
          warn_after: {count: 1, period: hour}
          error_after: {count: 24, period: hour}
Here is what we have told the above yml file to do.
| Parameter | Setting | Description |
|---|---|---|
loaded_at_field | date | Check in “date” field when was data last loaded |
warn_after | {count: 1, period: hour} | Issues a warning if the data in the date field is older than 1 hour. |
error_after | {count: 24, period: hour} | Issues an error if the data in the date field is older than 24 hours. |
Now when we go to command prompt and run:
dbt source freshnessWe get the following output
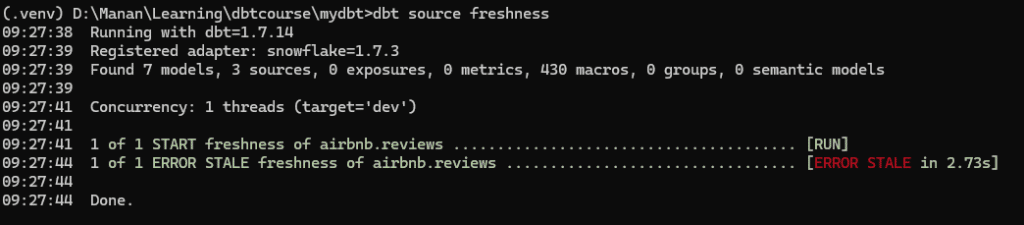
Creating tests in DBT
Concept: DBT tests
Dbt provides a comprehensive test framework to ensure data quality and reliability. Here’s a summary of tests that dbt supports.
| Test Type | Subtype | Description | Usage | Implementation method |
|---|---|---|---|---|
| Generic Tests | Built-in | Pre-built or out-of-the-box tests for common data issues such as uniqueness, not-null, and referential integrity. | unique, not_null, relationships,accepted_values | schema.yml using tests: key under model/column |
| Custom Generic Tests | Custom tests written by users that can be applied to any column or model, similar to built-in tests but with custom logic. | Custom reusable tests with user-defined SQL logic. | 1. Dbt automatically picks up from tests/generic/test_name.sql starting with {% tests %} . 2. Schema.yml by defining tests in .sql file and applying in schema.yml 3.macros: Historically, this wa the only place they could be defined. | |
| Singular Tests | Designed to validate a single condition and are not intended to be reusable e.g. check if total sales reported in a period matches the sum of individual sales record. | Custom SQL conditions specific to a model or field. | Dbt automatically picks up test from tests/test_name.sql | |
| Source Freshness Tests | Tests that check the timeliness of the data in your sources by comparing the current timestamp with the last updated timestamp. | dbt source freshness to monitor data update intervals. | Schema.yml using freshness: key under source/table |
Implementing Built-In Tests
We will begin by writing generic tests. To improve the readability of this article, I have moved the testing to an article of its own, please continue with implementing Built-In tests on this link.
Documenting models in DBT
In any data warehousing project, documentation act as a blueprint and reference guide for data structures. It should capture key information about data models essentially explaining what data is stored, how it is organised and how does it relate to other data. DBT solves the problem of documenting models by providing framework for implementing documentation within its own framework.
Writing documentations for our Models
DBT provides two methods for writing documentation. We can either write the documentation within the schema.yml file as text or we can write documentation in separate markup files and link them back to schema.yml file. We will explore both these options. Please follow this link to see hands-on documentation in DBT.
Conclusion
In this article, we created an end-to-end project pipeline using dbt and Snowflake. DBT makes it easier for data engineers to effectively build and manage reliable and scalable data pipelines. We started by loading data from S3 into Snowflake using the COPY INTO command, storing the raw data in a dedicated schema (Airbnb.RAW). Next, we configured Python and dbt, setting up a virtual environment, installing dbt-snowflake, creating a user in Snowflake with appropriate permissions, and initializing a dbt project connected to Snowflake. We then created staging layer models, which are SQL files representing transformations, to clean and structure the raw data. Using dbt commands, we built and verified these models. Moving on to the core layer, we applied further transformations and materializations, exploring different types like views, tables, incremental, and ephemeral. We created core models with appropriate materializations and verified them in Snowflake. To ensure data quality, we implemented generic and custom tests, as well as source freshness tests to monitor data timeliness. Lastly, we documented our models using schema.yml files and markdown files, generating and serving the documentation to provide a clear understanding of data models and transformations. By following these steps, data engineers can leverage dbt to build scalable and maintainable data pipelines, ensuring data integrity and ease of use for downstream analytics.